Checking your blood pressure at home has become very easy and common, especially with digital blood pressure monitors. Whether you have hypertension (high blood pressure), low blood pressure, or just want to keep a regular check on your health, these monitors are a helpful tool. But to get accurate readings, you need to know how to use them properly.
In this article, we’ll walk you through how to use a digital blood pressure monitor at home, step by step, in simple and easy-to-understand language. We’ll also give you some important tips and answer common questions people have about blood pressure monitoring.
What is a Digital Blood Pressure Monitor?
A digital blood pressure monitor is a small electronic device that measures your blood pressure and pulse. It usually includes:
- A cuff (to wrap around your upper arm or wrist)
- A display screen (shows the results)
- Start/Stop button (to operate it)
It uses automatic inflation and sensors to detect your blood pressure, and then shows your systolic and diastolic readings on the screen, along with your heart rate.
Why Monitoring Blood Pressure at Home is Important
Here are a few reasons why you should check your blood pressure at home:
- Better control over health: Helps track progress if you’re managing high blood pressure.
- Reduces white coat effect: Some people get nervous at the doctor’s office, which raises their BP.
- Daily or weekly checks: Makes it easier to monitor trends over time.
- Helps doctors make informed decisions: Provides extra data for your healthcare provider.
Step-by-Step Guide: How to Use a Digital Blood Pressure Monitor at Home
Here’s a simple way to check your blood pressure at home using a digital monitor:
1. Get Ready
- Sit in a quiet, relaxed space.
- Avoid eating, drinking caffeine, smoking, or exercising 30 minutes before checking.
- Empty your bladder before the test.
- Rest for 5 minutes before taking your reading.
2. Sit Correctly
Your sitting posture matters for accurate results:
- Sit on a straight-backed chair with your feet flat on the ground.
- Keep your back straight and supported.
- Place your arm on a table or flat surface at heart level.
- Relax your arm with the palm facing upward.
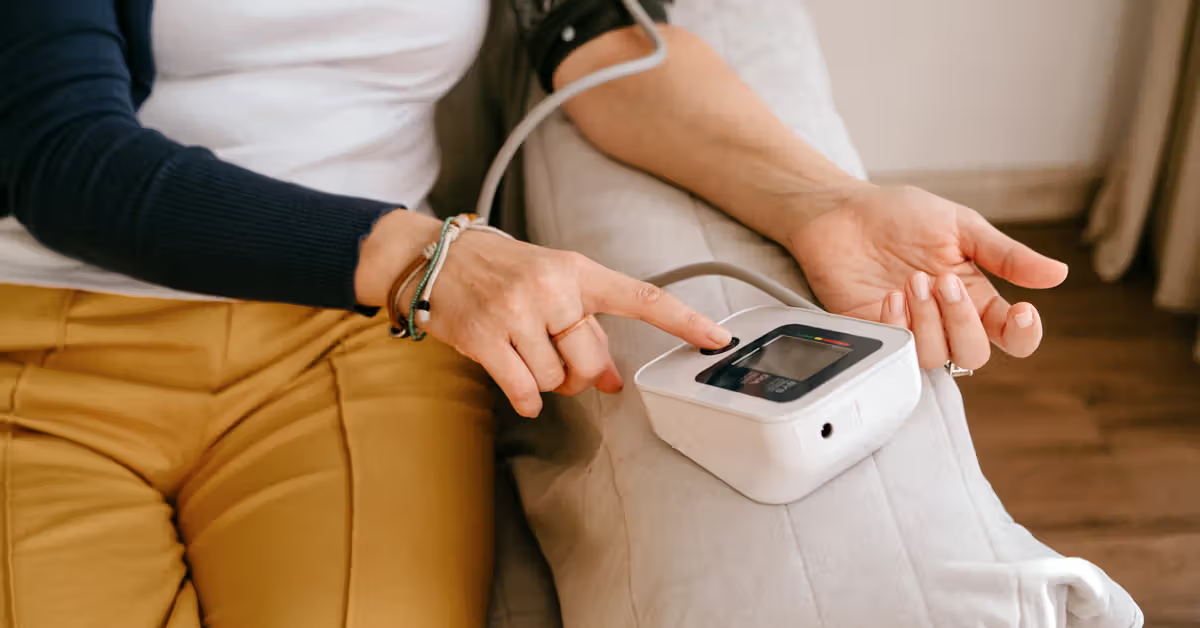
3. Place the Cuff Properly
Depending on your monitor type, place the cuff:
- Upper arm monitor: Wrap the cuff snugly around your upper arm, about 1 inch above the elbow.
- Wrist monitor: Place the cuff on your wrist, with the screen facing upward, and hold it at heart level.
Make sure the cuff is not too tight or too loose.
4. Start the Monitor
- Press the “Start” button.
- The cuff will inflate and then slowly deflate while measuring your blood pressure.
- Stay still, don’t talk, and breathe normally during the process.
5. Read and Record the Results
Once the monitor finishes:
- Look at the systolic (upper number), diastolic (lower number), and heart rate.
- Write them down with the date and time, or use the monitor’s memory feature if available.
6. Take Multiple Readings
- Take 2 to 3 readings, one minute apart, and average them for more accurate results.
Tips for Accurate Readings
- Use the same arm every time for consistency.
- Always check at the same time of day—preferably morning and evening.
- Don’t cross your legs or talk during measurement.
- Use a properly calibrated and approved monitor (look for FDA or CE approval).
- Take your monitor to your doctor’s appointment once in a while to compare with their readings.
Understanding the Readings
Here’s a general idea of what your numbers mean:
| Category | Systolic (mm Hg) | Diastolic (mm Hg) |
| Normal | Less than 120 | Less than 80 |
| Elevated | 120–129 | Less than 80 |
| High (Stage 1) | 130–139 | 80–89 |
| High (Stage 2) | 140 or higher | 90 or higher |
| Hypertensive Crisis | Higher than 180 | Higher than 120 |
If your reading is in the hypertensive crisis range, contact a doctor immediately
Common Mistakes to Avoid
- Checking BP right after eating or exercising
- Talking or moving during the reading
- Not positioning the arm at heart level
- Using the wrong cuff size
- Skipping rest time before checking
Keeping a Blood Pressure Log
Keep a record of your readings, either in a notebook or by using a mobile app. Include:
- Date and time
- Reading (e.g., 130/85 mm Hg)
- Any notes (e.g., headache, skipped medication, stress)
Share this log with your healthcare provider during checkups.
When to See a Doctor
Even if you’re monitoring at home, don’t skip regular checkups. See your doctor if:
- Your readings are consistently high or too low
- You experience symptoms like dizziness, chest pain, or headaches
- You’re unsure how to interpret your readings
Conclusion
Using a digital blood pressure monitor at home is simple, effective, and a great step toward taking charge of your health. With just a few minutes each day or week, you can keep track of your blood pressure and catch problems early. Just remember to sit correctly, use the cuff properly, and stay relaxed during the reading. And always consult your healthcare provider if you notice unusual patterns or have any health concerns.
5 Frequently Asked Questions (FAQs)
1. How often should I check my blood pressure at home?
If you’re under treatment, check it twice a day—once in the morning and once at night. If you’re just monitoring, a few times a week is enough.
2. Which arm should I use for checking blood pressure?
Use the same arm every time, usually the left arm, unless your doctor advises otherwise.
3. Can I check my blood pressure right after eating or walking?
No. Wait at least 30 minutes after eating, drinking caffeine, smoking, or physical activity before checking your blood pressure.
4. Is a wrist monitor as accurate as an upper arm monitor?
Wrist monitors can be less accurate if not used properly. Always keep your wrist at heart level for better results.
5. What is the ideal blood pressure for adults?
A normal blood pressure is considered less than 120/80 mm Hg. Anything higher or lower should be monitored and discussed with your doctor.